REST Web service: JWT – Token-based Authentication trong Jersey 2.x

Bài viết được sự cho phép của tác giả Giang Phan
Trong bài trước, chúng ta đã cùng tìm hiểu về xác thực và phân quyền ứng dụng sử dụng cơ chế Basic Authentication trong Jersey 2.x. Trong bài này, chúng ta cùng tìm hiểu về cơ chế Token-based Authentication sử dụng tiêu chuẩn JSON Web Token (JWT).
Giới thiệu Token-based Authentication trong Jersey REST API
JSON Web Token (JWT) là 1 tiêu chuẩn mở (RFC 7519), định nghĩa cách thức truyền tin an toàn giữa các ứng dụng bằng một đối tượng JSON. Dữ liệu truyền đi sẽ được mã hóa và chứng thực, có thể được giải mã để lấy lại thông tin và đánh dấu tin cậy nhờ vào “chữ ký” của nó. Phần chữ ký của JWT sẽ được mã hóa lại bằng HMAC hoặc RSA. Chi tiết các bạn xem lại bài viết “Giới thiệu Json Web Token (JWT)“.
Token-based Authentication là cơ chế xác thực người dùng dựa trên việc tạo ra token – một chuỗi ký tự (thường được mã hóa) mang thông tin xác định người dùng được server tạo ra và lưu ở client. Server sau đó có thể không lưu lại token này.
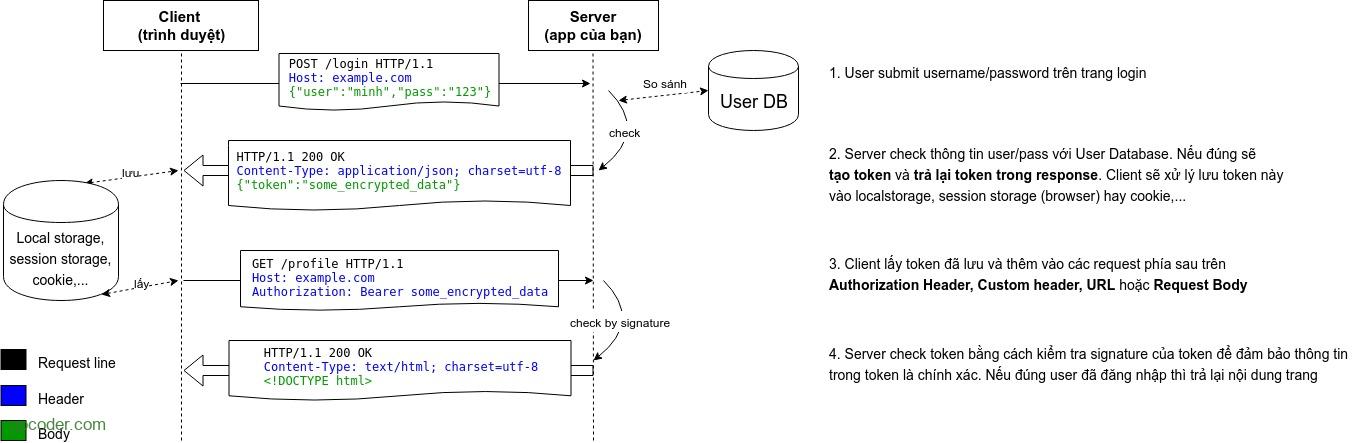
Tương tự như cơ chế Basic Authentication, với Token-based Authentication chúng ta cũng sẽ tạo ContainerRequestFilter để verify access của một user.
Token-based Authentication trong Jersey Server
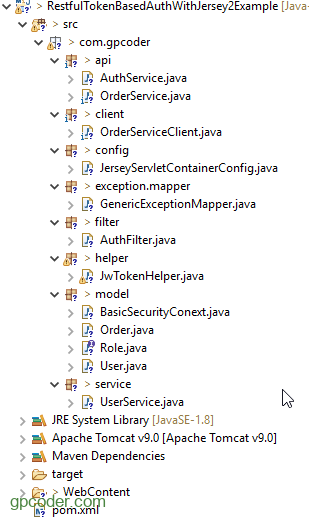
Tạo Jersey project
Chúng ta sẽ tạo project mới tương tự project Basic Authentication ở bài viết trước.
Khai báo thư viện hỗ trợ JWT
Có nhiều thư viện Java hỗ trợ tạo JWT và verify JWT. Chúng ta có thể sử dụng một trong hai thư viện phổ biến sau:
Trong bài này, chúng ta sẽ sử dụng thư viện io.jsonwebtoken để minh họa cho Token-based Authentication trong Jersey REST API.
Mở file pom.xml và thêm các dependency sau:
|
1
2
3
4
5
6
7
8
9
10
11
12
13
14
15
16
17
|
<dependency> <groupId>io.jsonwebtoken</groupId> <artifactId>jjwt-api</artifactId> <version>0.10.5</version></dependency><dependency> <groupId>io.jsonwebtoken</groupId> <artifactId>jjwt-impl</artifactId> <version>0.10.5</version> <scope>runtime</scope></dependency><dependency> <groupId>io.jsonwebtoken</groupId> <artifactId>jjwt-jackson</artifactId> <version>0.10.5</version> <scope>runtime</scope></dependency> |
Tạo các data model class
Order.java
|
1
2
3
4
5
6
7
8
9
10
11
12
13
14
15
16
17
|
package com.gpcoder.model;import javax.xml.bind.annotation.XmlRootElement;import lombok.AllArgsConstructor;import lombok.Data;import lombok.NoArgsConstructor;@Data@AllArgsConstructor@NoArgsConstructor@XmlRootElementpublic class Order { private Integer id; private String name;} |
User.java
|
1
2
3
4
5
6
7
8
9
10
11
12
13
14
15
16
17
|
package com.gpcoder.model;import java.util.List;import lombok.AllArgsConstructor;import lombok.Data;import lombok.NoArgsConstructor;@Data@AllArgsConstructor@NoArgsConstructorpublic class User { private String username; private String password; private List<String> roles;} |
Role.java
|
1
2
3
4
5
6
7
|
package com.gpcoder.model;public interface Role { String ROLE_ADMIN = "Admin"; String ROLE_CUSTOMER = "Customer";} |
Tạo service để hỗ trợ lấy thông tin User.
UserService.java
|
1
2
3
4
5
6
7
8
9
10
11
12
13
14
15
16
17
18
19
20
21
22
23
24
25
26
27
28
29
|
package com.gpcoder.service;import java.util.ArrayList;import java.util.Arrays;import com.gpcoder.model.Role;import com.gpcoder.model.User;/** * This is a dummy class to get the user information */public class UserService { public User getUser(String username) { User user = new User(); user.setUsername(username); user.setPassword("gpcoder"); if ("admin".equals(username)) { user.setRoles(Arrays.asList(Role.ROLE_ADMIN)); } else if ("customer".equals(username)) { user.setRoles(Arrays.asList(Role.ROLE_CUSTOMER)); } else if ("gpcoder".equals(username)) { user.setRoles(Arrays.asList(Role.ROLE_ADMIN, Role.ROLE_CUSTOMER)); } else { user.setRoles(new ArrayList<>()); } return user; }} |
Tạo SecurityContext class
SecurityContext : chứa thông tin chứng thực của một request. Sau khi chứng thực thành công, chúng ta cần cung cấp thông tin chứng thực user, role cho context class này. Các phương thức của SecurityContext sẽ được triệu gọi trước khi các resource method đã đánh dấu với các Annotation @RolesAllowed hoặc @PermitAll hoặc @DenyAll được thực thi.
BasicSecurityConext.java
|
1
2
3
4
5
6
7
8
9
10
11
12
13
14
15
16
17
18
19
20
21
22
23
24
25
26
27
28
29
30
31
32
33
34
35
36
37
38
39
40
41
42
43
44
|
package com.gpcoder.model;import java.security.Principal;import javax.ws.rs.core.SecurityContext;/** * The SecurityContext interface provides access to security related * information. An instance of SecurityContext can be injected into a JAX-RS * resource class field or method parameter using the @Context annotation. * * @see https://jersey.github.io/documentation/latest/security.html * @see https://docs.oracle.com/javaee/7/api/javax/ws/rs/core/SecurityContext.html */public class BasicSecurityConext implements SecurityContext { private User user; private boolean secure; public BasicSecurityConext(User user, boolean secure) { this.user = user; this.secure = secure; } @Override public Principal getUserPrincipal() { return () -> user.getUsername(); } @Override public boolean isUserInRole(String role) { return user.getRoles().contains(role); } @Override public boolean isSecure() { return secure; } @Override public String getAuthenticationScheme() { return SecurityContext.BASIC_AUTH; }} |
Tạo REST API
Tạo rest api để chứng thực user và cung cấp web token.
|
1
2
3
4
5
6
7
8
9
10
11
12
13
14
15
16
17
18
19
20
21
22
23
24
25
26
27
28
29
30
31
32
33
34
35
36
37
38
39
40
41
42
43
44
45
|
package com.gpcoder.api;import javax.ws.rs.Consumes;import javax.ws.rs.FormParam;import javax.ws.rs.POST;import javax.ws.rs.Path;import javax.ws.rs.Produces;import javax.ws.rs.core.MediaType;import javax.ws.rs.core.Response;import com.gpcoder.helper.JwTokenHelper;import com.gpcoder.model.User;import com.gpcoder.service.UserService;@Path("/auth")public class AuthService { /** * Authenticating a user with their username/ password and issuing a token * * @param username * @param password * @return JSON Web Token (JWT) */ @POST @Produces(MediaType.APPLICATION_JSON) @Consumes(MediaType.APPLICATION_FORM_URLENCODED) public Response authenticateUser(@FormParam("username") String username, @FormParam("password") String password) { // Authenticate the user using the credentials provided UserService userService = new UserService(); User user = userService.getUser(username); if (user == null || !user.getPassword().equals(password)) { return Response.status(Response.Status.FORBIDDEN) // 403 Forbidden .entity("Wrong username or password") // the response entity .build(); } // Issue a token for the user String token = JwTokenHelper.createJWT(user); // Return the token on the response return Response.ok(token).build(); }} |
Chúng ta cung cấp các REST API như sau:

OrderService.java
|
1
2
3
4
5
6
7
8
9
10
11
12
13
14
15
16
17
18
19
20
21
22
23
24
25
26
27
28
29
30
31
32
33
34
35
36
37
38
39
40
41
42
43
44
45
46
47
48
49
50
51
52
53
54
|
package com.gpcoder.api;import javax.annotation.security.PermitAll;import javax.annotation.security.RolesAllowed;import javax.ws.rs.DELETE;import javax.ws.rs.GET;import javax.ws.rs.POST;import javax.ws.rs.PUT;import javax.ws.rs.Path;import javax.ws.rs.PathParam;import javax.ws.rs.core.Context;import javax.ws.rs.core.Response;import javax.ws.rs.core.SecurityContext;import com.gpcoder.model.Order;import com.gpcoder.model.Role;// URI:// http(s)://<domain>:(port)/<YourApplicationName>/<UrlPattern in web.xml>/<path>// http://localhost:8080/RestfulWebServiceExample/rest/orders@Path("/orders")@PermitAllpublic class OrderService { @GET @Path("/{id}") public Response get(@PathParam("id") int id) { System.out.println("OrderService->get()"); return Response.ok("OrderService->get()").build(); } @RolesAllowed(Role.ROLE_CUSTOMER) @POST public Response insert(Order order, @Context SecurityContext securityContext) { System.out.println("User: " + securityContext.getUserPrincipal().getName()); System.out.println("OrderService->insert()"); return Response.ok("OrderService->insert()").build(); } @RolesAllowed({ Role.ROLE_ADMIN, Role.ROLE_CUSTOMER }) @PUT public Response update(Order order) { System.out.println("OrderService->update()"); return Response.ok("OrderService->update()").build(); } @RolesAllowed(Role.ROLE_ADMIN) @DELETE @Path("/{id}") public Response delete(@PathParam("id") int id) { System.out.println("OrderService->delete()"); return Response.ok("OrderService->delete()").build(); }} |
Tạo class helper để hỗ trợ tạo Json Web Token (JWT), kiểm tra tính hợp lệ của token và extract thông tin user cần thiết.
|
1
2
3
4
5
6
7
8
9
10
11
12
13
14
15
16
17
18
19
20
21
22
23
24
25
26
27
28
29
30
31
32
33
34
35
36
37
38
39
40
41
42
43
44
45
46
47
48
49
50
51
52
53
54
55
56
57
58
59
60
61
62
63
64
65
66
67
68
69
70
71
72
73
74
75
76
77
78
79
80
81
82
83
84
85
86
87
88
89
90
91
92
93
94
95
96
97
98
99
100
101
102
103
|
package com.gpcoder.helper;import java.security.Key;import java.util.Date;import java.util.List;import java.util.UUID;import java.util.concurrent.TimeUnit;import java.util.function.Function;import javax.crypto.spec.SecretKeySpec;import javax.xml.bind.DatatypeConverter;import com.gpcoder.model.User;import io.jsonwebtoken.Claims;import io.jsonwebtoken.JwtBuilder;import io.jsonwebtoken.Jwts;import io.jsonwebtoken.SignatureAlgorithm;public class JwTokenHelper { // The privateKey is only valid for the given minutes private static final long EXPIRATION_LIMIT_IN_MINUTES = 30; // The JWT signature algorithm we will be using to sign the token private static final SignatureAlgorithm SIGNATURE_ALGORITHM = SignatureAlgorithm.HS256; // Keys used with HS256 MUST have a size >= 256 bits private static final String SECRET_KEY = "gpcoderdotcom-token-base-authentication-with-jwt-example"; private static final String ISSUER = "https://gpcoder.com"; private JwTokenHelper() { super(); } public static String createJWT(User user) { // Get the current time long currentTimeInMillis = System.currentTimeMillis(); Date now = new Date(currentTimeInMillis); // The privateKey is only valid for the next EXPIRATION_LIMIT_IN_MINUTES long expirationTimeInMilliSeconds = TimeUnit.MINUTES.toMillis(EXPIRATION_LIMIT_IN_MINUTES); Date expirationDate = new Date(currentTimeInMillis + expirationTimeInMilliSeconds); // Will sign our JWT with our ApiKey secret byte[] apiKeySecretBytes = DatatypeConverter.parseBase64Binary(SECRET_KEY); Key signingKey = new SecretKeySpec(apiKeySecretBytes, SIGNATURE_ALGORITHM.getJcaName()); // Sets the JWT Claims sub (subject) value Claims claims = Jwts.claims().setSubject(user.getUsername()); claims.put("roles", user.getRoles()); // Let's set the JWT Claims JwtBuilder builder = Jwts.builder() // Configured and then used to create JWT compact serialized strings .setClaims(claims).setId(UUID.randomUUID().toString()) // Sets the JWT Claims jti (JWT ID) value .setIssuedAt(now) // Sets the JWT Claims iat (issued at) value .setIssuer(ISSUER) // Sets the JWT Claims iss (issuer) value .setExpiration(expirationDate) // Sets the JWT Claims exp (expiration) value .signWith(signingKey, SIGNATURE_ALGORITHM); // Builds the JWT and serializes it to a compact, URL-safe string return builder.compact(); } /** * Get User from the given token */ public static User getUserFromToken(String token) { final Claims claims = decodeJWT(token); User user = new User(); user.setUsername(claims.getSubject()); user.setRoles((List<String>) claims.get("roles")); return user; } /** * Check if the token was issued by the server and if it's not expired */ public static Boolean isTokenExpired(String token) { final Date expiration = getExpirationDateFromToken(token); return expiration.before(new Date()); } private static Date getExpirationDateFromToken(String token) { return getClaimFromToken(token, Claims::getExpiration); } private static <T> T getClaimFromToken(String token, Function<Claims, T> claimsResolver) { final Claims claims = decodeJWT(token); return claimsResolver.apply(claims); } private static Claims decodeJWT(String jwt) { // This line will throw an exception if it is not a signed JWS (as expected) return Jwts.parser() // Configured and then used to parse JWT strings .setSigningKey(DatatypeConverter.parseBase64Binary(SECRET_KEY)) // Sets the signing key used to verify // any discovered JWS digital signature .parseClaimsJws(jwt) // Parses the specified compact serialized JWS string based .getBody(); }} |
Tạo ContainerRequestFilter để chứng thực user
Chúng ta sử dụng ContainerRequestFilter để thực hiện chứng thực user trước khi truy cập resource method.
- Lấy thông tin Authorization từ header ở phía client gửi lên.
- Tách lấy token từ Authentication header.
- Kiểm tra tính hợp lệ của token.
- Thực hiện chứng thực user.
- Lấy thông tin user từ token.
- Lưu thông tin chứng thực lại để các request sau có thể kiểm tra chứng thực mà không cần truy xuất database, chẳng hạn @RolesAllowed.
|
1
2
3
4
5
6
7
8
9
10
11
12
13
14
15
16
17
18
19
20
21
22
23
24
25
26
27
28
29
30
31
32
33
34
35
36
37
38
39
40
41
42
43
44
45
46
47
48
49
50
51
52
53
54
55
56
57
58
59
60
61
62
63
64
65
66
67
68
69
70
71
72
73
74
75
76
77
78
79
80
81
82
83
84
85
|
package com.gpcoder.filter;import java.io.IOException;import javax.annotation.Priority;import javax.ws.rs.Priorities;import javax.ws.rs.container.ContainerRequestContext;import javax.ws.rs.container.ContainerRequestFilter;import javax.ws.rs.core.HttpHeaders;import javax.ws.rs.core.Response;import javax.ws.rs.core.SecurityContext;import javax.ws.rs.ext.Provider;import com.gpcoder.helper.JwTokenHelper;import com.gpcoder.model.BasicSecurityConext;import com.gpcoder.model.User;@Provider@Priority(Priorities.AUTHENTICATION) // needs to happen before authorizationpublic class AuthFilter implements ContainerRequestFilter { private static final String REALM = "gpcoder"; private static final String AUTHENTICATION_SCHEME = "Bearer"; /** * Extracting the token from the request and validating it * * The client should send the token in the standard HTTP Authorization header of * the request. For example: Authorization: Bearer <token-goes-here> * * Finally, set the security context of the current request */ @Override public void filter(ContainerRequestContext requestContext) throws IOException { // (1) Get Token Authorization from the header String authorizationHeader = requestContext.getHeaderString(HttpHeaders.AUTHORIZATION); // (2) Validate the Authorization header if (!isTokenBasedAuthentication(authorizationHeader)) { return; } // (3) Extract the token from the Authorization header String token = authorizationHeader.substring(AUTHENTICATION_SCHEME.length()).trim(); try { // (4) Validate the token if (JwTokenHelper.isTokenExpired(token)) { abortWithUnauthorized(requestContext); return; } // (5) Getting the User information from token User user = JwTokenHelper.getUserFromToken(token); // (6) Overriding the security context of the current request SecurityContext oldContext = requestContext.getSecurityContext(); requestContext.setSecurityContext(new BasicSecurityConext(user, oldContext.isSecure())); } catch (Exception e) { abortWithUnauthorized(requestContext); } } private boolean isTokenBasedAuthentication(String authorizationHeader) { // Check if the Authorization header is valid // It must not be null and must be prefixed with "Bearer" plus a whitespace // The authentication scheme comparison must be case-insensitive return authorizationHeader != null && authorizationHeader.toLowerCase().startsWith(AUTHENTICATION_SCHEME.toLowerCase() + " "); } private void abortWithUnauthorized(ContainerRequestContext requestContext) { // Abort the filter chain with a 401 status code response // The WWW-Authenticate header is sent along with the response Response respone = Response.status(Response.Status.UNAUTHORIZED) // 401 Unauthorized .header(HttpHeaders.WWW_AUTHENTICATE, AUTHENTICATION_SCHEME + " realm="" + REALM + """) .entity("You cannot access this resource") // the response entity .build(); requestContext.abortWith(respone); }} |
Chi tiết về Filter các bạn xem lại bài viết “Filter và Interceptor với Jersey 2.x“.
Đăng ký RolesAllowedDynamicFeature
Để có thể áp dụng các Annotation @RolesAllowed, @PermitAll hoặc @DenyAll, chúng ta cần đăng ký sử dụng tính năng này với Jersey.
|
1
2
3
4
5
6
7
8
9
10
11
12
13
14
15
16
17
18
19
20
21
22
23
24
25
|
package com.gpcoder.config;import java.util.logging.Level;import java.util.logging.Logger;import org.glassfish.jersey.jackson.JacksonFeature;import org.glassfish.jersey.logging.LoggingFeature;//Deployment of a JAX-RS application using @ApplicationPath with Servlet 3.0//Descriptor-less deploymentimport org.glassfish.jersey.server.ResourceConfig;import org.glassfish.jersey.server.filter.RolesAllowedDynamicFeature;public class JerseyServletContainerConfig extends ResourceConfig { public JerseyServletContainerConfig() { // if there are more than two packages then separate them with semicolon packages("com.gpcoder"); register(new LoggingFeature(Logger.getLogger(LoggingFeature.DEFAULT_LOGGER_NAME), Level.INFO, LoggingFeature.Verbosity.PAYLOAD_ANY, 10000)); register(JacksonFeature.class); // This authorization feature is not automatically turned on. // We need to turn it on by ourself. register(RolesAllowedDynamicFeature.class); }} |
Tạo custom exception để xử lý kết quả trả về Client khi có ngoại lệ xảy ra
GenericExceptionMapper.java
|
1
2
3
4
5
6
7
8
9
10
11
12
13
14
15
16
17
18
19
20
21
22
23
24
25
26
27
28
|
package com.gpcoder.exception.mapper;import javax.ws.rs.WebApplicationException;import javax.ws.rs.core.MediaType;import javax.ws.rs.core.Response;import javax.ws.rs.ext.ExceptionMapper;import javax.ws.rs.ext.Provider;@Providerpublic class GenericExceptionMapper implements ExceptionMapper<Throwable> { @Override public Response toResponse(Throwable ex) { return Response.status(getStatusType(ex)) .entity(ex.getMessage()) .type(MediaType.TEXT_PLAIN) // "text/plain" .build(); } private Response.StatusType getStatusType(Throwable ex) { if (ex instanceof WebApplicationException) { return((WebApplicationException)ex).getResponse().getStatusInfo(); } else { // 500, "Internal Server Error" return Response.Status.INTERNAL_SERVER_ERROR; } }} |
Chi tiết về xử lý ngoại lệ với Jersey, các bạn xem lại bài viết “HTTP Status Code và xử lý ngoại lệ RESTful web service với Jersey 2.x“.
Test ứng dụng với Postman
Test @GET http://localhost:8080/RestfulWebServiceExample/rest/orders/1
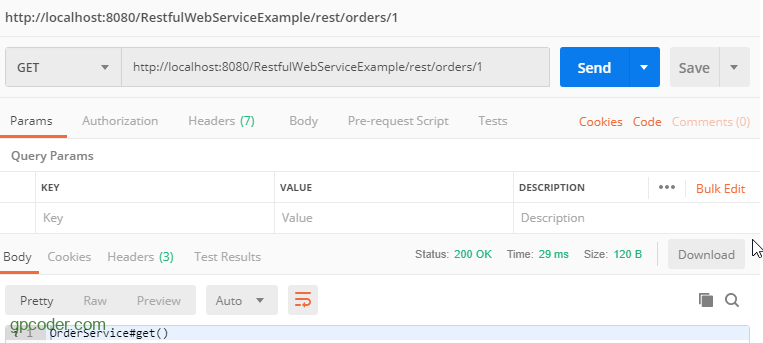
Như bạn thấy, chúng ta vẫn truy xuất được resource method với @PermitAll.
Test @DELETE http://localhost:8080/RestfulWebServiceExample/rest/orders/1
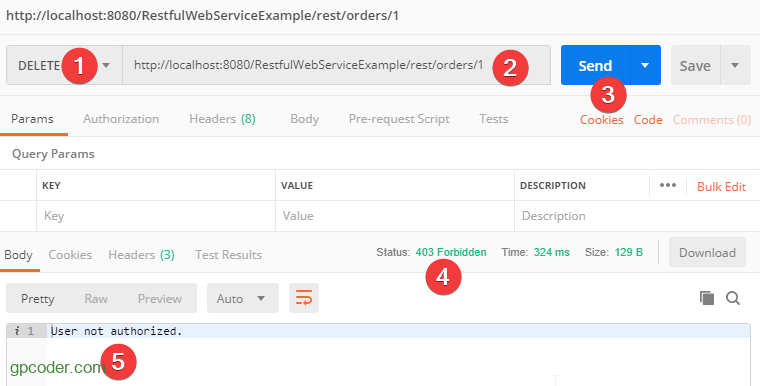
Chúng ta nhận được thông báo lỗi 403, do chưa được chứng thực với user có role Admin.
Bây giờ, chúng ta đăng nhập với user Admin để lấy token:
@POST http://localhost:8080/RestfulWebServiceExample/rest/auth
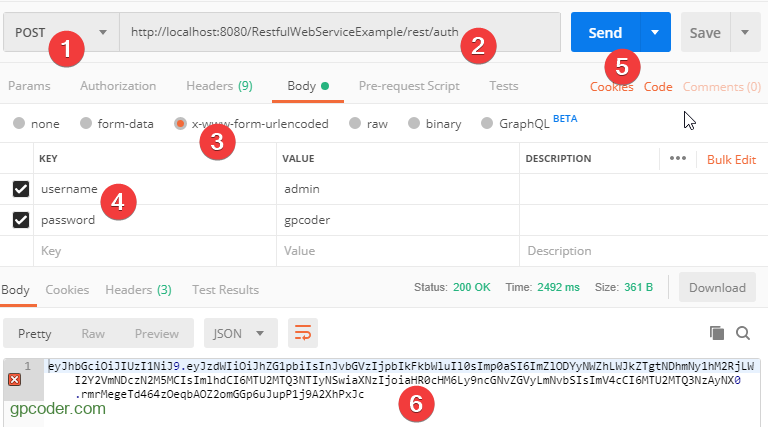
Tiếp theo, chúng ta sẽ sử dụng token này để truy cập resource.
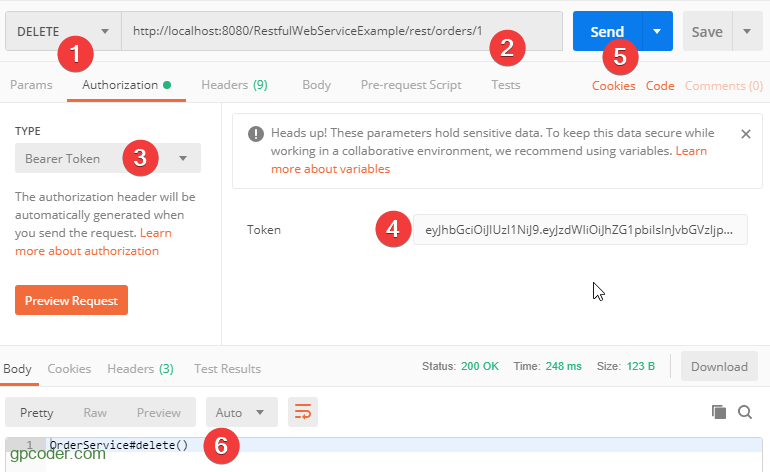
Chúng ta đã truy xuất thành công resource với user có role Admin.
Tương tự các bạn test với @POST, @PUT lần lượt với các username là customer, admin, test và password là gpcoder để xem kết quả.
JWT – Token-based Authentication trong Jersey Client
Ví dụ: tạo ứng dụng REST Client truy cập @DELETE resource.
|
1
2
3
4
5
6
7
8
9
10
11
12
13
14
15
16
17
18
19
20
21
22
23
24
25
26
27
28
29
30
31
32
33
34
35
36
37
38
39
40
41
42
43
44
45
46
47
48
49
50
51
52
53
54
55
56
57
58
59
60
61
62
63
|
package com.gpcoder.client;import java.util.logging.Level;import java.util.logging.Logger;import javax.ws.rs.client.Client;import javax.ws.rs.client.ClientBuilder;import javax.ws.rs.client.Entity;import javax.ws.rs.client.Invocation;import javax.ws.rs.client.WebTarget;import javax.ws.rs.core.Form;import javax.ws.rs.core.MediaType;import javax.ws.rs.core.Response;import org.glassfish.jersey.client.ClientConfig;import org.glassfish.jersey.logging.LoggingFeature;public class OrderServiceClient { public static final String AUTH_URL = "http://localhost:8080/RestfulWebServiceExample/rest/auth"; public static final String API_URL = "http://localhost:8080/RestfulWebServiceExample/rest/orders"; public static void main(String[] args) { // (1) Authenticate and get token final String token = getToken(); // (2) Call @DELETE API Client client = createJerseyRestClient(); WebTarget target = client.target(API_URL).path("1"); Invocation.Builder invocationBuilder = target.request(MediaType.APPLICATION_JSON_TYPE); invocationBuilder.header("Authorization", "Bearer " + token); final Response response = invocationBuilder.delete(); // (3) Handle result System.out.println("Call delete() successful with the result: " + response.readEntity(String.class)); } private static String getToken() { Form formData = new Form(); formData.param("username", "admin"); formData.param("password", "gpcoder"); Client client = createJerseyRestClient(); WebTarget target = client.target(AUTH_URL); Response response = target.request(MediaType.APPLICATION_JSON_TYPE).post(Entity.form(formData)); return response.readEntity(String.class); } private static Client createJerseyRestClient() { ClientConfig clientConfig = new ClientConfig(); // Config logging for client side clientConfig.register( // new LoggingFeature( // Logger.getLogger(LoggingFeature.DEFAULT_LOGGER_NAME), // Level.INFO, // LoggingFeature.Verbosity.PAYLOAD_ANY, // 10000)); return ClientBuilder.newClient(clientConfig); }} |
Lưu ý: ngoài cách thêm thông tin header thủ công trong mỗi request, chúng ta có thể tạo một ClientRequestFilter để tự động thêm thông tin header như đã giới thiệu trong bài viết “Filter và Interceptor với Jersey 2.x“.
- Sử dụng Swagger UI trong jersey REST WS project
- Tạo ứng dụng Java RESTful Client không sử dụng 3rd party libraries
- Tạo ứng dụng Java RESTful Client với thư viện OkHttp
Xem thêm công việc IT hấp dẫn trên Station D